QUSIR


  • Startseite

  • Archiv

使用ngrok实现内网穿透

Veröffentlicht am 2017-04-21

##安装依赖项

sudo apt-get install supervisor

sudo apt-get install mercurial git gcc 

##安装go
tar -C /usr/local -xzf go1.8.1.linux-amd64.tar.gz
echo “export PATH=$PATH:/usr/local/go/bin” >> ~/.bashrc

使环境变量生效

source .bashrc 

##同步代码
git clone https://github.com/inconshreveable/ngrok.git

##生成密匙

openssl genrsa -out rootCA.key 2048
openssl req -x509 -new -nodes -key rootCA.key -subj "/CN=lianghuanhan.club" -days 5000 -out rootCA.pem
openssl genrsa -out device.key 2048
openssl req -new -key device.key -subj "/CN=lianghuanhan.club" -out device.csr
openssl x509 -req -in device.csr -CA rootCA.pem -CAkey rootCA.key -CAcreateserial -out device.crt -days 5000

##复制密匙

cp rootCA.pem assets/client/tls/ngrokroot.crt
cp device.crt assets/server/tls/snakeoil.crt
cp device.key assets/server/tls/snakeoil.key

##编译源码
make release-server

make release-client

编译win7 64位客户端

GOOS=windows GOARCH=amd64 make release-client

##启动服务器端

./ngrokd -domain="lianghuanhan.club" -httpAddr=":8088" -httpsAddr=":8089"

##启动客户端
编辑配置文件
vim ngrok.cfg
写入以下数据

server_addr: lianghuanhan:4443
trust_host_root_certs: false

###linux 64位客户端
监听http 80端口
./ngrok -subdomain pub -proto=http -config=ngrok.cfg 80
监听tcp 22端口
./ngrok -subdomain pub -proto=tcp -config=ngrok.cfg 22

###windows 64位客户端
监听远程桌面端口
ngrok.exe -subdomain pub -proto=tcp -config=ngrok.cfg 3389

##在浏览器中输入:localhost:4040 (在客户端上)

可以查看所有的请求情况!

view

##注意事项

1.为lianghuanhan.club添加dns解析

添加两条A记录:lianghuanhan.club和*.lianghuanhan.club,指向lianghuanhan.club所在的服务器ip。

2.客户端ngrok.cfg中server_addr后的值必须严格与-domain以及证书中的"/CN=lianghuanhan.club"相同,必须先生成证书,拷贝到相应目录,再编译代码。
mysql删除有空格字符名称的触发器

Veröffentlicht am 2017-04-12

之前在mysq添加触发器的过程中,使用名称不规范使产生如下触发器名称:

door_machine_insert_ trigger

中间存在空格字符

使用以下删除语句时候提示出错

DROP TRIGGER door_machine_insert_ trigger;

然后改为

DROP TRIGGER `door_machine_insert_ trigger`;

删除成功

使用android studio查看andrdoid源码

Veröffentlicht am 2017-04-12

#说明
为了查看android源码,之前使用Source Insight查看源码,然后发现使用android studio查看源码也挺方便的。

##使环境变量生效
进入android源码目录执行以下指令

source ./build/envsetup.sh 

编译完整个源码后执行以下指令编译idegen模

mmm development/tools/idegen/

提示以下信息则编译成功

...... #### make completed successfully (7 seconds) ####

接着执行以下脚本

development/tools/idegen/idegen.sh

提示以下信息则编译成功

Read excludes: 21ms Traversed tree: 194799ms

以上指令执行成功后会在源码目录下生成相应的工程文件android.ipr,然后打开android studio打开工程,使用android.ipr导入整个源码。

mysql udf插件开发

Veröffentlicht am 2017-04-08

#编写mysql插件

##查看mysql插件so目录

###进入mysql后执行如下指令
SHOW VARIABLES LIKE ‘plugin_dir’;

显示

plugin_dir =/usr/local/mysql/lib/plugin/

编译

gcc $(mysql_config --cflags) -shared -fPIC -o calc_distance_udf.so calc_distance_udf.c

将生成so拷到指定目录

cp calc_distance_udf.so /usr/local/mysql/lib/plugin/

进入mysql创建funcation

CREATE FUNCTION calc_distance_udf 
   RETURNS REAL
   SONAME "calc_distance_udf.so";

##注意
如果以上创建function出错的时候要检查下so文件的权限是否可读。
查看funcation
USE mysql;
SELECT * FROM func;

测试

select calc_distance_udf(1.0, 2.0, 3.0, 4.0);

参考教程

http://blog.loftdigital.com/blog/how-to-write-mysql-functions-in-c

#注意:
mysql udf的执行方式是mysql程序启动的时候加载so文件到内存,有FUNCATION调用的时候,执行so里面的程序。所以更新so文件后要重启mysql服务。

如果使用Ubuntu的apt直接安装mysql,编译的时候会出现找不到相应的头文件,执行以下命令

sudo apt-get install libmysql++-dev

还有在不同的平台下要使用对应的编译器重新编译,32位对应32位,64位对应64位。

自己编写DEMO

docker使用代理

Veröffentlicht am 2017-04-08

#说明
由于docker官方原版镜像被墙,使用Shadowsocks翻墙,通过privoxy由socker转为http协议,实现docker代理。

#创建目录
mkdir -p /etc/systemd/system/docker.service.d

#创建配置文件
vim /etc/systemd/system/docker.service.d/http-proxy.conf
写入以下数据

[Service]
Environment="HTTP_PROXY=http://proxy.example.com:80/"

http://proxy.example.com为代理地址

#更新配置
sudo systemctl daemon-reload

#检查配置
systemctl show –property=Environment docker

正常会输出以下信息

Environment=HTTP_PROXY=http://proxy.example.com:80/

#重启docker
sudo systemctl restart docker

#测试
docker pull ubuntu:14.04
docker run -it –rm ubuntu:14.04 bash

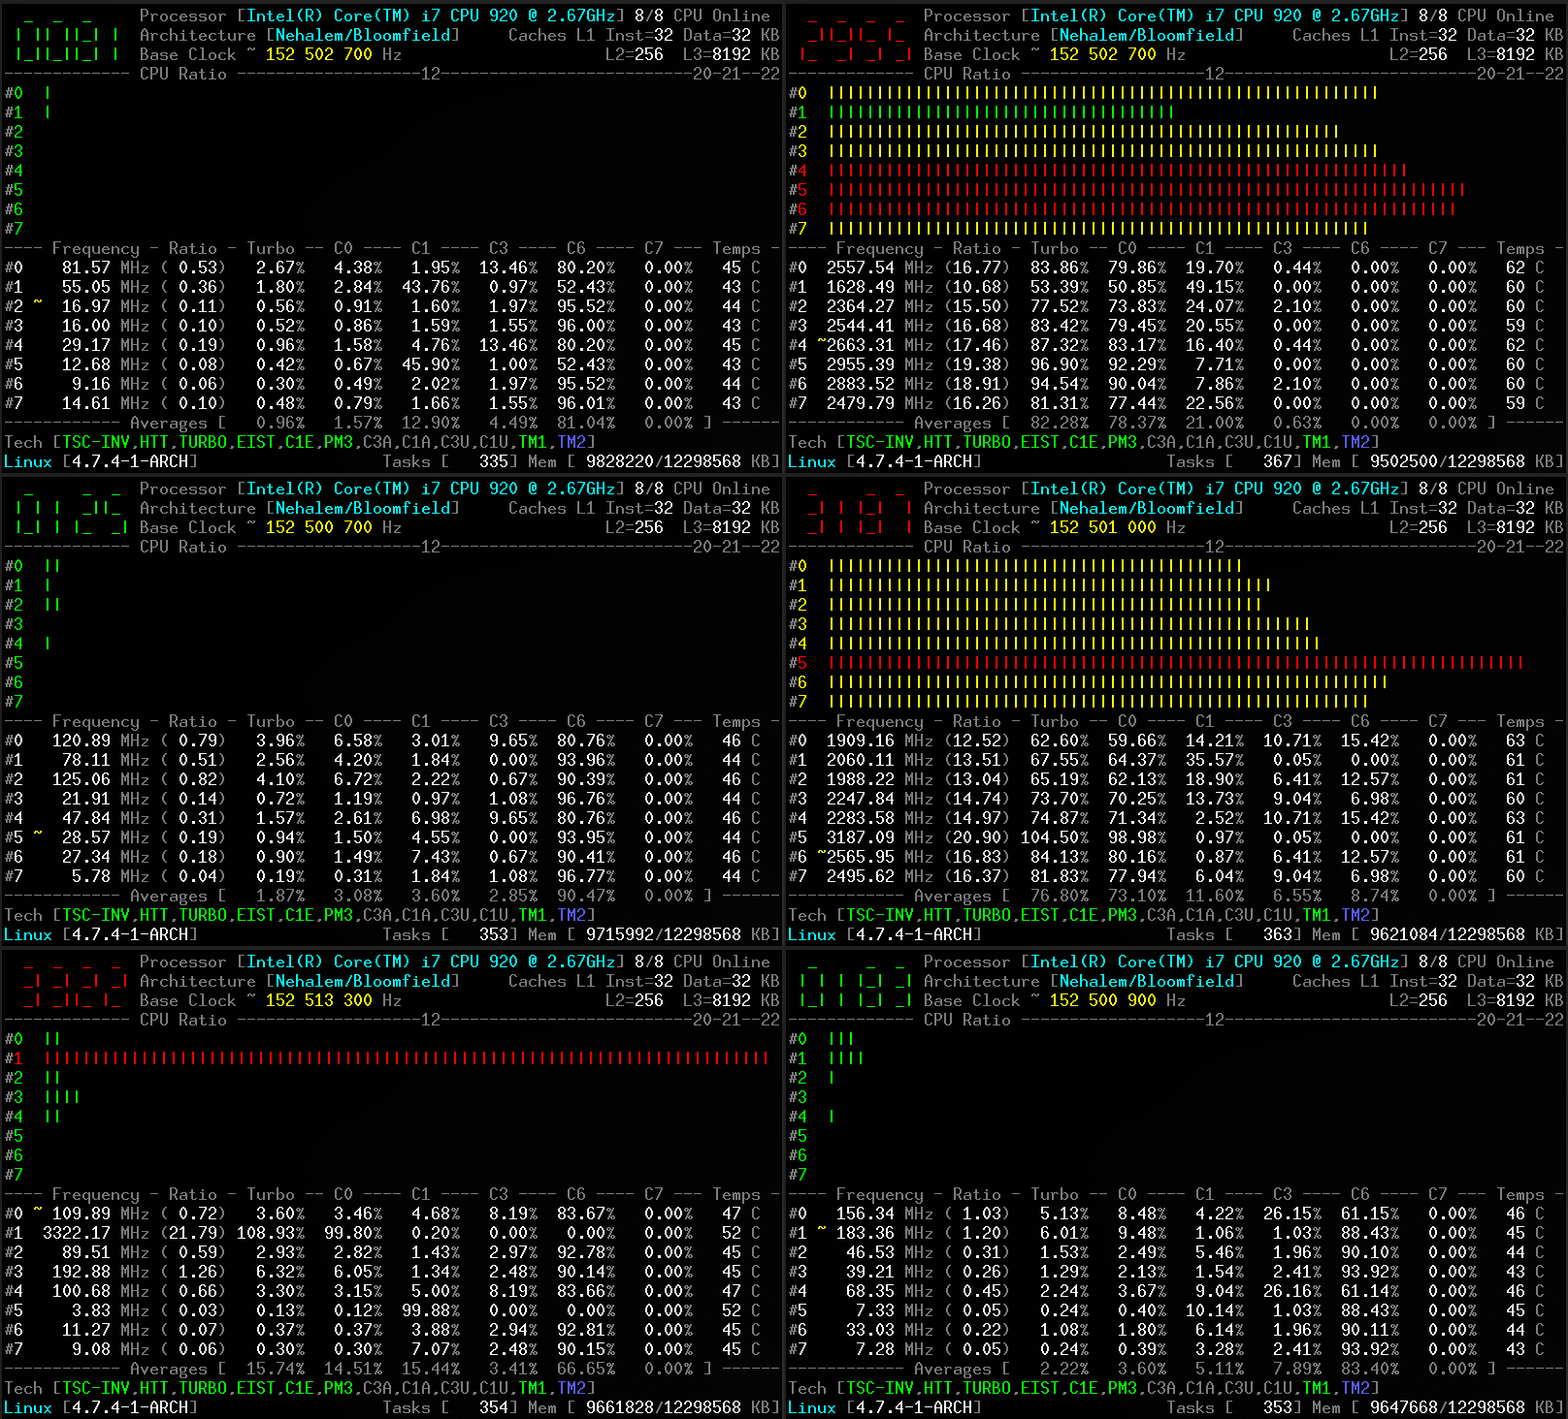
CoreFreq CPU监控软件

Veröffentlicht am 2017-04-08

CoreFreq说明

CoreFreq是一款专为64位处理器设计的CPU监控软件,架构为英特尔Atom,Core2,Nehalem,SandyBridge和高级AMD系列0F

alt text

#详细使用教程
https://github.com/cyring/CoreFreq

Ubuntu16.04安装Stacer工具

Veröffentlicht am 2017-04-08

##说明
Stacer工具可以显示系统资源使用情况,清除系统垃圾,卸载软件,关闭开启自启动服务。

##安装

###deb 包安装

Debian Linux x86(Ubuntu)

  1. Download Stacer_1.0.4_i386.deb from the Stacer releases page.
  2. Run sudo dpkg --install Stacer_1.0.4_i386.deb on the downloaded package.
  3. Launch Stacer using the installed Stacer command.

Debian Linux x64 (Ubuntu)

  1. Download Stacer_1.0.4_amd64.deb from the Stacer releases page.
  2. Run sudo dpkg --install Stacer_1.0.4_amd64.deb on the downloaded package.
  3. Launch Stacer using the installed Stacer command.

###源码安装
git clone https://github.com/oguzhaninan/Stacer.git
cd Stacer
npm install && npm start

##卸载

运行sudo dpkg -r Stacer

#使用

##仪表板

Stacer

##系统清洁

System_Cleaner

##启动应用程序
Startup_Apps

##服务
Services

##卸载程序

Uninstaller

ubuntu16.04搭建xrdp远程桌面链接

Veröffentlicht am 2017-03-12

#说明

xrdp支持xfce4和mate桌面,不支持gnome和ubuntu桌面

由于之前安装xfce4桌面后屏幕上显示一条黑线,所以选择放弃使用xfce4桌面使用mate桌面。

##安装mate桌面

sudo apt-get install mate-core mate-desktop-environment mate-notification-daemon

#安装tightvncserver
sudo apt-get install tightvncserver

#安装xrdp
sudo apt-get install xrdp

#配置xrdp
echo mate-session >~/.xsession
vim /etc/xrdp/startwm.sh

#在./etc/X11/Xsession前插入
mate-session
#重启xrdp
cd /etc/init.d/

#卸载xrdp和tightvncserver

sudo apt-get purge xrdp

sudo apt-get purge tightvncserver

#要注意地方
一定要先装tightvncserver后装xrdp,不能够装vnc4server,已改为tightvncserver.

#完成的效果图

view

Mediostream框架filter使用说明

Veröffentlicht am 2017-03-12

##1.链接说明

   ms_filter_link(stream->soundread,0,stream->ec,0);
ms_filter_link(stream->ec,0,stream->encoder,0);    
//inputs[0] 将数据链接到0
ms_filter_link(stream->decoder,0,stream->ec,1);
ms_filter_link(stream->ec,1,stream->soundwrite,0);
//inputs[1]将数据链接到1

##2.数据读取

while((tmp=ms_queue_get(f->inputs[1]))!=NULL){
    //拿回inputs[1]数据  是从soundread来的
    log_error("save_voice tmp.pcm");
    inputlen=msgdsize(tmp);
    memcpy(tmpinput,tmp->b_rptr,inputlen);
    save_voice(voicetmp,tmpinput,inputlen);
   //save_voice(voicetmp,tmp->b_rptr,msgdsize(tmp));
    ile++;
    ce=allocb(inputlen,0);

    memcpy(ce->b_rptr, tmp->b_rptr, inputlen);

    ce->b_wptr+=inputlen;
    ms_queue_put(f->outputs[1],ce);

    freemsg(tmp);
}

while((im=ms_queue_get(f->inputs[0]))!=NULL){
    int len=msgdsize(im);
//拿回inputs[0]数据   是从decoder来的

##3.接口说明

MSFilterDesc ms_webrtc_aec_desc={
    MS_WEBRTC_AEC_ID,
    "MSWebRTCAEC",
    "Echo canceller using WebRTC library.",
    MS_FILTER_OTHER,
    "AEC",
    2,  //两进两出  ipnuts[0]和inputs[1]
    2,
    webrtc_aec_init,
    webrtc_aec_preprocess,
    webrtc_aec_process,
    webrtc_aec_postprocess,
    webrtc_aec_uninit,
    webrtc_aec_methods,
    0
};

同步webrtc_android源码

Veröffentlicht am 2017-03-12

##下载同步工具

git clone https://chromium.googlesource.com/chromium/tools/depot_tools.git

##配置环境变量

$ export PATH=`pwd`/depot_tools:"$PATH"

##开始同步

fetch --nohooks webrtc_android
gclient sync
1234…6

我思,故我在!

58 Artikel
© 2018 我思,故我在!
Erstellt mit Hexo
|
Theme — NexT.Muse v5.1.4